Armoured Combat
Potrero 2024 Battlefield Scenarios
Background
Seeking to expand their ever-growing empire, the Purple Imperial Army has invaded the South! The Argent Independent City-States scramble to unite their allies and stop the advance of the advancing army.
Set up
The following general guidelines will be used in the construction and execution of all scenarios:
- Marshall’s Point will open at 9:00 AM each day of combat.
- Fighting will start at 10:00 AM.
- The boundaries of each battlefield will be defined by stakes and caution tape or in some cases by a line of hay bales.
- Generally, there will be five minutes in between rounds of scenarios. There will be fifteen minute breaks when transitioning to a different scenario.
- The ‘Hat’s On’ signal will be given via a distinct air horn, whistle or verbal signal 5 minutes before ‘Lay On’.
- ‘Lay On’ will be signaled with a distinct air horn, whistle or verbal signal.
- The scenario will conclude with a distinct airhorn, whistle or verbal signal.
Scenario Rules and Structure
The following rules will apply to ALL scenarios, unless otherwise noted in the individual scenario breakdowns:
- There are no prohibitions on weapons types between scenarios. All legal weapons are allowed at all times for all scenarios.
- Thrown weapons and combat archery will be allowed in ALL scenarios. Gleaning arrows can be accomplished in between rounds or off the battlefield during combat. Archers are advised to bring melee weapons and/or extra arrows/bolts in order to maximize their participation.
- Marshalls will ensure firing lanes and safety areas are established for all scenarios to reduce the likelihood of projectiles endangering the audience.
- Two feet out of bounds is off the edge of the world, for both stake/tape lines and hay bales.
- Unarmored participants (such as Marshalls, photographers,etc) who are on or near an active battle should wear protective gear (such as eye protection) and exercise caution at all times.
Schedule of Scenarios
Friday
- Open Field (4 rounds)
- Ambush Scenario (4 rounds)
- Resurrection Hold-the-Center Bridge Scenario (20 mins)
- Castle Assault (4 rounds)
Saturday
- Open Field (4 rounds)
- Ambush Scenario (4 rounds)
- Resurrection Hold-the-Center Bridge Scenario (20 mins)
- Castle Assault (4 rounds)
- Dodge-Hammer: Thrown Weapon Dodgeball
Sunday
- Ambush Scenario (4 rounds)
- Resurrection Hold-the-Center Bridge Scenario (10 mins)
- Castle Assault (4 rounds)
- Dodge-Hammer: Thrown Weapon Dodgeball
Open Field Medics/Chirurgeons Scenario
Background
Hostilities have ignited between the invading Imperial Purple Army and the Argent Independent City-States and their allies. They meet in open battle for the first time, augmented with their own healers and chirurgeons.
Set-up
The Purple and White sides will be positioned opposite each other on either side of the field. Combat archery and thrown weapons will be allowed in all rounds, so appropriate boundaries and firing lanes must be maintained in order to protect the audience from stray projectiles. Additionally, any siege weapon(s) will be placed in such a way as to minimize the risk of projectiles to the audience.
Each team will be provisioned with four foam sticks (pool noodles) that will be used to designate battlefield medics/chirurgeons. They will be responsible for choosing which combatants will be act as medics. These combatants must have adequate hand protection on both hands i.e. the foam pool noodle hand must be protected by a full gauntlet.
Battlefield
As defined during the walkthrough in coordination with Potrero campground. Boundaries will be set with caution tape and wooden stakes.
Scenario Rules
Each team will be provided with four foam sticks (pool noodles) that will be used to designate their battlefield medics. Each medic has the following special rules/abilities:
- Medics can revive fallen combatants by placing or tapping their helmets with their foam noodle and stating ‘Rise, and fight again”. This should take no less than a two-count.
- Medics can have a shield or weapon in their free hand, as long as their hands are adequately protected.
- Medics can fight and kill enemy combatants with their weapon, if they choose to have one.
- Medics cannot kill combatants with their foam noodle.
- Medics can be killed via any normal means.
- Medics cannot be revived once killed. The noodle will remain where it is dropped until the scenario is reset.
- If a non-medic combatant is killed, they must fall where they were or otherwise indicate they are ‘wounded’. They are now immobile until healed.
The battle will proceed to the last man standing. The side with any remaining combatants will be judged the winner. The scenario will be fought four times, with Purple and White sides shifting starting sides on the 3rd and 4th round.
Ambush the King
Background
The King’s army is ambushed by the enemy while marching.
Set up
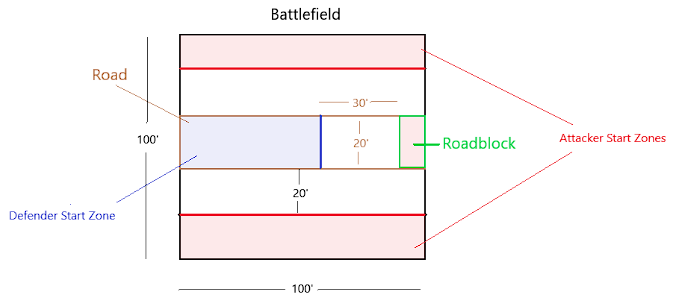
The battlefield will be set up with the following features:
- 100’ x 100’
- The Road – 20-foot wide portion of the center of the battlefield running completely across it from the west side to the east side.
- The Roadblock – A row of hay bales representing a felled tree placed at the west end of the Road, behind which a siege weapon will be concealed. The hay bales are to be treated as-is and may be fought and climbed over.
Battlefield
Scenario Rules
Defenders: They must begin the scenario on the Road and be facing the Roadblock. They may not set up closer than 30 feet to the Roadblock. They will designate a King (VIP) who will wear a unique tabard colored to match their side-tape.
Attackers: They must begin the scenario at least 20 feet from the Road on the north or south side and be kneeling.
Once “Lay On” is called the siege weapon will be revealed and all combatants may move freely about the battlefield. The scenario will be timed. Combat will continue until either the attacking or defending forces are completely destroyed. The scenario will be fought four times. The Attacking and Defending forces will switch for the 3rd and 4th bouts. Fastest victory out of the four bouts wins the scenario.
Bridge Hold-the-Middle Scenario
Background
Purple attempts to force crossing a bridge, Argent attempts to stop them!
Set-up
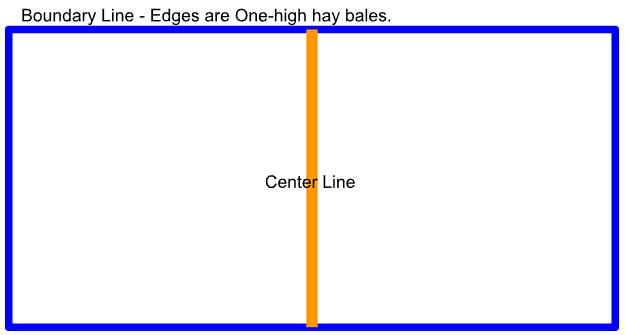
- The bridge will be lined with 1 hay bale high barriers on the sides.
- An edge-of-the-world will be marked on opposite sides.
Battlefield
- Prioritize a flat area (no gully) that is dust-free.
Scenario Rules
The following rules will apply to the bridge scenario:
- Both sides will have unlimited resurrections.
- Points will be recorded at 5 min intervals for whichever team is holding the center of the bridge.
- Archers may stand on hay bales.
- There is no melee fighting while standing on the hay bales.
- Two feet off the hay bale is dead.
- No jumping off the hay bales.
Advancing Fortification Assault
Background
The enemy army is encamped in an old motte and bailey fortification. The attackers surprise them with a forward assault!
Set-up
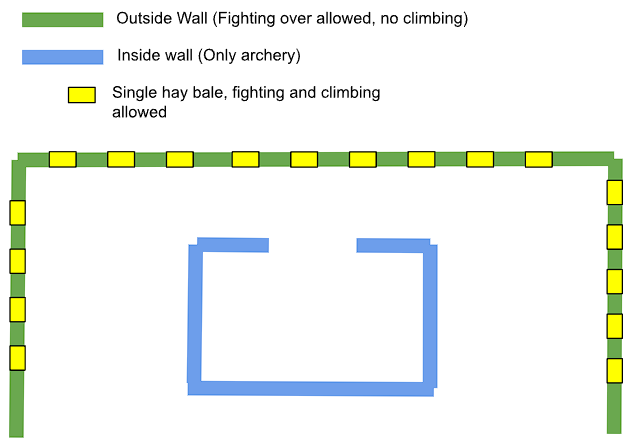
The fortification will consist of an outer rampart (motte) and an inner keep (bailey) with the following characteristics:
- The outer fortification (motte) will consist of a hay bale rampart, one hay bales high, with three hay bale high crenellations placed at regular intervals. A single hay bale high step will be placed on the inner side of the rampart where these crenellations occur. Fighting is allowed over the wall by all weapons types from both the attacking and defending side. Stepping on one hay bale high is allowed. Stepping or climbing over two hay bales or higher is prohibited.
- A square inner keep (3 haybales high) will be constructed with one gate and infinitely high walls. Archers may stand on and fire from haybale steps on the inner side of this wall, but cannot be engaged from outside the keep, except by other archers and siege weapons. The keep will have one main gate facing the rampart at least two hay bale lengths wide.
Combat archery and thrown weapons will be allowed in all rounds, so appropriate boundaries and firing lanes must be maintained in order to protect the audience from stray projectiles. Additionally, any siege weapon(s) will be placed in such a way as to minimize the risk of projectiles to the audience.
Battlefield
The fortification will be constructed as follows:
Scenario Rules
Defenders:
- Defenders will start on the end of the broken field, adjacent to the bridge. At ‘lay on’ they may position themselves wherever they find the most advantageous.
- Defenders will have infinite resurrections until the last redoubt is taken by the attacking team.
- The defender’s res point will be behind the fortification and will remain consistent through the entire scenario.
- Defenders may not take a redoubt point back once it is lost.
Attackers:
- Attackers will start at their resurrection point and have infinite resurrections.
- The attacking team will start with three flags. A redoubt is taken once a flag is planted in the corresponding redoubt stanchion.
- After a redoubt is taken, the attacking team’s res point becomes the forwardmost redoubt.
The battles will be timed, with the time ending when the last defender is killed. The scenario will be fought four times, with Purple and White sides shifting starting sides on the 3rd and 4th round. The team with the shortest average assault time (when their two times are averaged together) shall be judged the victor.
Thrown Weapon Dodgeball: Dodge-Hammer
Background
The free peoples of the White Independent City-States challenge the invading Purple Imperials to a deadly game of thrown-weapon dodgeball. If you can dodge a hammer, you can dodge death itself!
Set-up
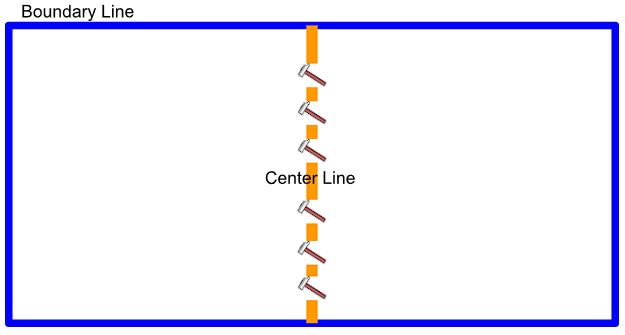
The battlefield will be set-up like a standard dodgeball court, rectangular and divided into two equal halves. The middle and all boundary lines will be marked appropriately. Prior to lay-on, all combatants will place thrown weapons on the center line.
Battlefield
The court will be constructed as follows:
Scenario Rules
This special scenario will have the following rules, in addition to standard dodgeball rules:
- No melee combat is allowed with any weapons, including thrown weapons. Thrown weapons must be thrown.
- Attackers must stay in their zone. Stepping two feet out or over the center-line immediately kills the combatant.
- Attackers acknowledge arms and leg shots as normal. Shots to the torso, head, groin and throat are considered ‘kill’ shots and the combatant is out.
- Matches are untimed. The team with the last combatant(s) standing wins.
- There are no shields or weapons other than thrown weapons allowed.
- There are no ‘telling blows’ in this event. A thrown weapon that makes contact with you is considered good.
The scenario will use standard dodgeball rules:
- Participants must stay in their zone (their half of the court, for the duration of the match).
- Combatants will run to the center line to retrieve weapons at the beginning of combat.
- Combatants are ‘out’ if they fail to block a thrown weapon and it makes contact with their body. There are no ‘telling blows’ in this event.
- Combatants may block thrown weapons with thrown weapons they are holding.
- If a combatant throws a weapon at an opponent, and then the opponent catches it, the combatant who threw the weapon is out. Also, you are awesome.